External Email Warning Bypass
External Email Warning Bypass for Office365 & Outlook
TLDR
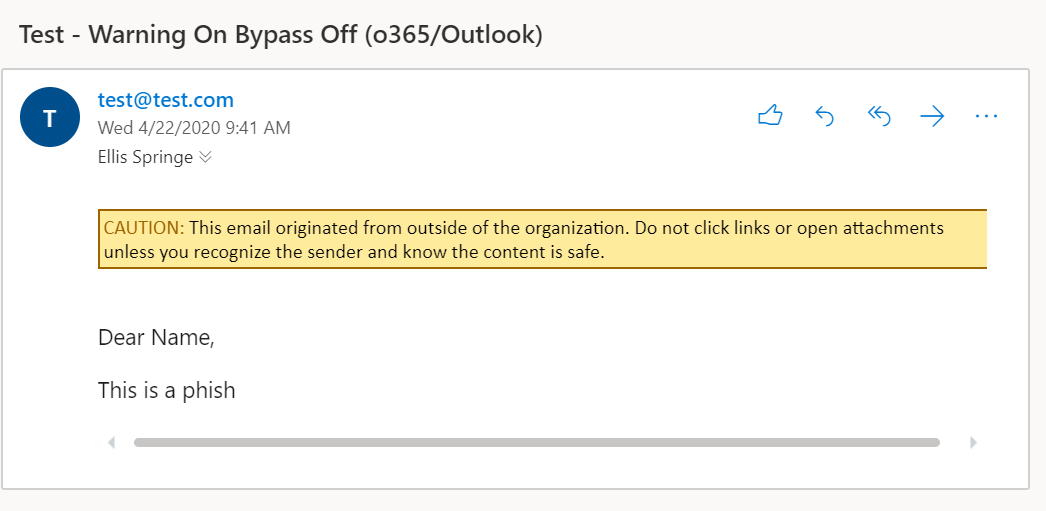
Company emails are often receiving phishing emails from malicious actors using similar domains as the company. To combat this. Administrators set rules to label these emails as an “external email” and tend to set some sort of warning to prevent users from clicking it. One of the most common ways to set this prepending HTML code to the beginning of the external email, as shown below.
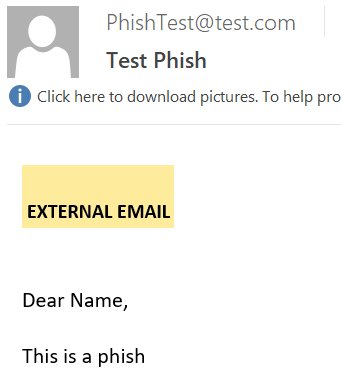
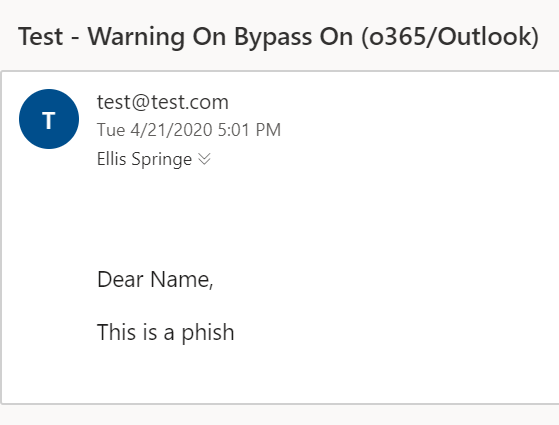
This provides the user with a big indicator that the email is not from the internal domain and should be read with caution. However, with a little bit of HTML tampering on the attackers side, we can force the receiving end to not display this error as shown below.
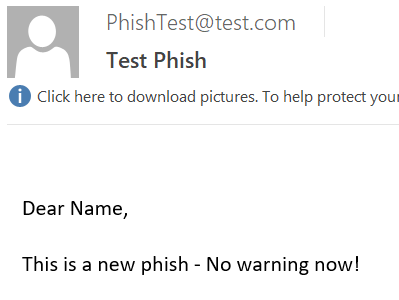
My implementation of the POC works for the Outlook desktop client as well as the Outlook WebApp. See the “POC” Section for steps, and pay attention to the limitations.
Summary
On a client engagement, we had a scenario that was pretty unorthodox for a penetration test. For this client we had a long term contract, and they specifically wanted us to use their testing machines, so on the first day we were set up with a corporate laptop, internal company email, and a Kali VM. We started on the external test, and quickly managed to gain access to a few Office 365 user accounts. We weren’t able to use this to gain code execution, so we downloaded the Global Address List to use in a phishing campaign. While we were browsing email inboxes, we noticed that every non-internal email had a large “EXTERNAL EMAIL” marker set on top of the email.
We began setting up our phishing C2 and began sending test emails to our internal account to test the format, and we kept seeing the “EXTERNAL EMAIL” marker on our emails. We decided to see if there was any way to get rid of this.

We inspected the source of the received email and found that it was adding a few lines of code into our email:

Essentially the filter just an injected a small table and filled it with color and the warning sign. Initially we tried commenting the section out or adding anything above the message that would potentially eliminate the warning, but the filter appeared to be taking anything in the <body> tag and placing this below it. This left us with the <head> tag to manipulate.
There are a few tags that you can put within the <head> section: title and style are the main ones, but you can put near any HTML tag within there and it will operate normally. We again tried to add commenting there as well, but this ended up with malformed HTML. The <title> tag didn’t change anything either. We landed on CSS styling to try and obfuscate this warning.
The way CSS styling works is that there are overall type styling declarations in the header, but any styling done per tag in the body would override the generic styling. Since the tags they were injecting already had color specified, we wouldn’t be able to change it to white to make it invisible. Similarly, we couldn’t make the font size 0. The visibility:hidden tag also didn’t seem to be working in outlook. We landed on the display:none tag that we could add to these specific things.
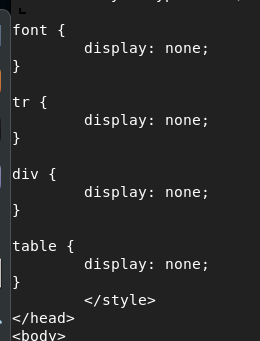
Adding these tags forced the external email warning to go away!

That’s great, but where do we go from here? One thing we did find out was that even though the text was not visible, the EXTERNAL EMAIL warning was still clearly there and displayed on the email preview on the scroll bar.
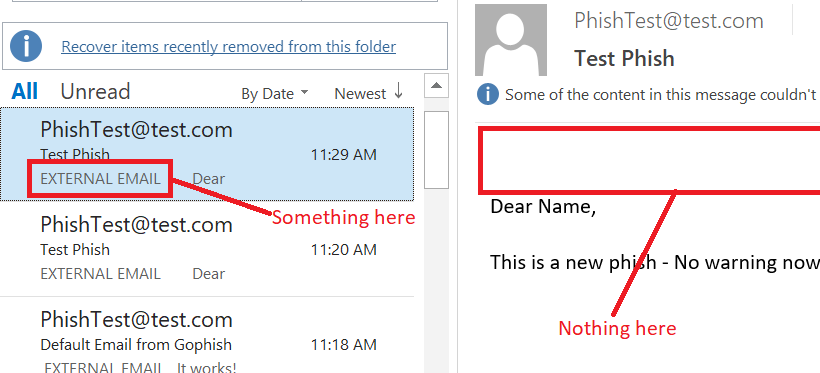
This we were not able to get to go away. Due to a limitation in Outlook, CSS styling tags like ::before cannot be applied so there does not appear to be any way to introduce different text before this to fool the preview. Unfortunately, that is a limitation of this obfuscation technique. That being said, the impact of this limitation is very small, a typical user would not notice this, especially if they are used to seeing a larger, more pronounced warning.
So ultimately we have achieved our goal. We were able to introduce a little bit of HTML/CSS into our email to get rid of the external email warning. So where do we go from here? Surely other companies structure this differently, use different tags, etc, so how can I make a generic “catch all” that will obfuscate ANY additional HTML warnings a company might introduce. The answer was simple: whitelisting only the things I, as an attacker, wanted visible.
Since I had control over the CSS styling of the whole page, I had the power to set the “display” properties for everything. A method that worked great for me was setting the entire <body> tag to display:none; this made everything, including anything injected in my a filter, blank. From there, I assigned a unique class to all pieces of HTML that I injected, and assigned a display:block styling to them, This allowed me to “whitelist” any HTML I wanted by assigning it to my class, and everything else in the email would be invisible. Code shown below.
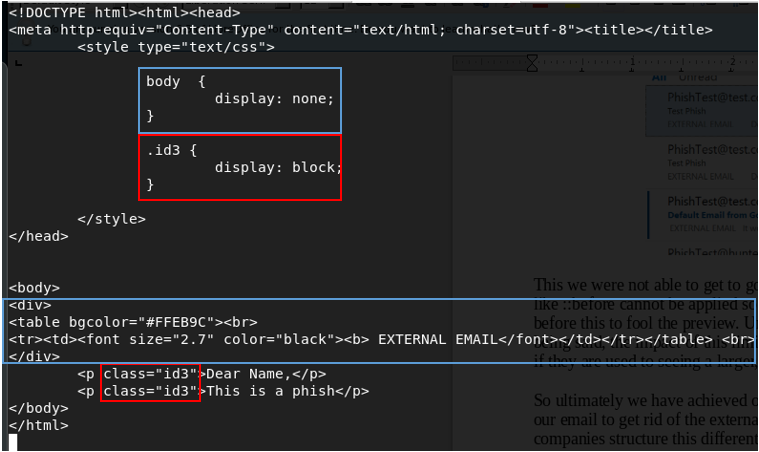
This was the catch all that I needed. After applying these changes, we were able to get 20 out of 250 users to not only click on the link, but download and execute payload from an external site. Only one user reported it.
Ultimately, this is a cool way to try and evade warning labels put in by system administrators. Even though there are ways to remediate this, it ultimately doesn’t hurt your phish by putting this in there. There is no way it would make a phish more apparent.
Impact
This external warning is custom for each implementation, but in general anything can be bypassed. To demonstrate impact, I searched Google for the top 5 results on how to configure this warning and used their template. End of the day, the attached POC was able to bypass each one. At the time of MSRC submission, the links were:
- https://answers.microsoft.com/en-us/msoffice/forum/all/mail-flow-external-message-warning-help/38e75efe-5945-451a-bcd0-f80d8d685a23
- https://community.spiceworks.com/how_to/164036-set-an-external-email-header-on-inbound-emails-office-365
- https://www.securit360.com/blog/configure-warning-messages-office-365-emails-external-senders/
- https://supertekboy.com/2020/02/17/add-external-sender-disclaimer-in-office-365/
- https://gcits.com/knowledge-base/warn-users-external-email-arrives-display-name-someone-organisation/
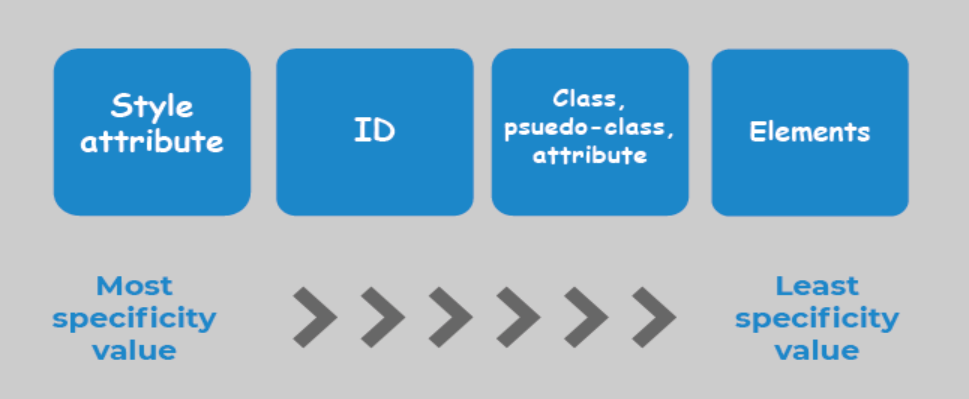
The way HTML styling works, this can be applied to any bypass. The style tag has the ability to override any HTML on the page, because it has the highest precedent.
This vulnerability is applicable to both the Outlook desktop client as well as the Outlook web application (outlook.office.com).
Outlook.office.com
Outlook client


POC
Full POC here.
Add the following code to the
body{ display: none; }
.CLASSNAME { display: block; }
Then for each part of the HTML in the <body> section add ‘class=“CLASSNAME” ’. Anything you add this to will be visible in the phish, anything else will not be displayed. See the screenshot on the previous page for an example. This is a very simple example, adding more tags will bypass more things. See the full POC for a generic catch-all.
Limitations
As stated before adding this to your phish will not hurt its performance (UPDATE: unless they detect on this behavior, see below), however there are some things to take note of.
- Still displays warning message in preview
As noted above, the warning message is still shown in the email preview because the text is still the first thing on the page. This, however, is likely overlooked especially if the actual email doesn’t reflect the same warning.

- Implementation Specific
The HTML warning is configurable by the SysAdmin in charge, so configurations tend to be different. I’ve tested on the top 5 implementations on Google, and it works, but its still possible that it could be configured in a preventative way. The POC should be a catch all, but its hard to test every possible configuration.
Remediation
There is only one remediation technique that can help prevent this attack (only one that I’ve found at least).
Outlook has a method of “classifying” emails, and setting appropriate labels for them accordingly. This label can be made into a warning, and it is not displayed within the HTML and cannot therefore be manipulated. A screenshot of the classification label is shown below.
A link to an applicable blog can be found here.
UPDATE: Additionally, there is one company who has provided detections for this kind of phishing email, Inky. A link to some of their marketing material for this issue can be found here: https://www.inky.com/understanding-phishing-disappearing-banners. Note that I am in no way associate with this company, nor can I vouch for their products in an official capacity as I haven’t used them myself. I’m just happy they’ve shown an effort in remediating this problem.
Disclosure Timeline
- December, 2019 - Discovery
- May 7, 2020 - Disclosure to MSRC
- June 1, 2020 - MSRC “Won’t Fix”
- April 21, 2021 - Public disclosure on Twitter
- April 21, 2021 - My disclosure on Twitter
Ultimately after discovery, research and “won’t fix” from MSRC, I decided not to disclose publicly. I believed that even with potential remediation techniques, the ability to obscure warning signs would severely impact the community since phishing is the biggest cause of compromise. I only chose to post this info after it had already been publicized online.
Please apply remediation advice, keep your users safe. For all you red teamers, happy hunting.